Quick Answer: Can You Use eSIM on Vivo?
Yes, you can use eSIM on selected Vivo phones, but not every Vivo model supports it.
To check, go to:
Settings > SIM card & mobile network > Add eSIM
If you see the “Add eSIM” option, your Vivo phone likely supports eSIM. If the option does not appear, your model, region, carrier, or software version may not support eSIM.
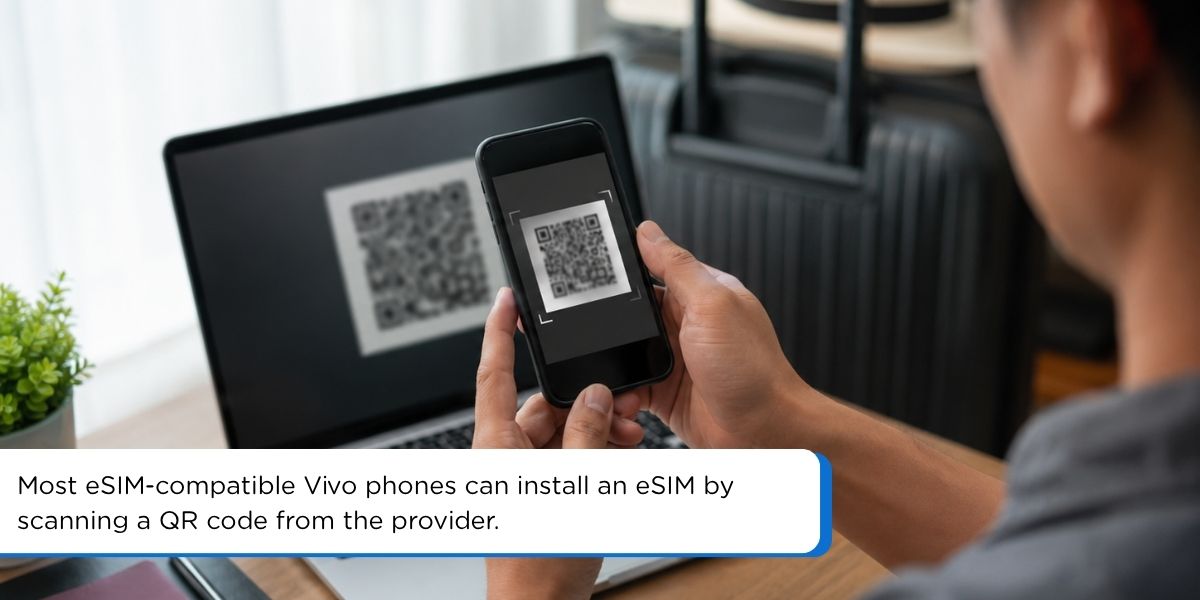
Once your phone is compatible, you can activate an eSIM by scanning a QR code or entering the activation code manually. For travel eSIMs, install the eSIM before your trip if needed, but turn on data roaming only after you arrive at your destination.
Which Vivo Phones Support eSIM?
Not all Vivo phones support eSIM. eSIM availability depends on your exact model, the country or region where the phone was purchased, your carrier, and your software version.
According to vivo’s official eSIM support information, selected vivo models support eSIM, including some devices in the X series, V series, Y series, and newer lineups. Examples may include vivo X90 Pro, X100 Pro, X200 series, X300 series, V29/V29 Lite 5G, V40 series, V50 series, V60 series, V70 series, and selected Y series models, depending on market availability. Because eSIM support can vary by model and region, it’s best to confirm your device on vivo’s official eSIM support page and in your phone settings.
That means a Vivo phone with the same model name may support eSIM in one country but not in another. For example, some models sold in Europe, Latin America, or selected Asian markets may show the eSIM option, while another regional version of the same phone may not.
The safest way to check is directly on your phone:
Settings > SIM card & mobile network > Add eSIM
If you see “Add eSIM” or “eSIM,” your vivo phone likely supports eSIM. If this option does not appear, your phone may not support eSIM, or the feature may be disabled by region, carrier, or software version.
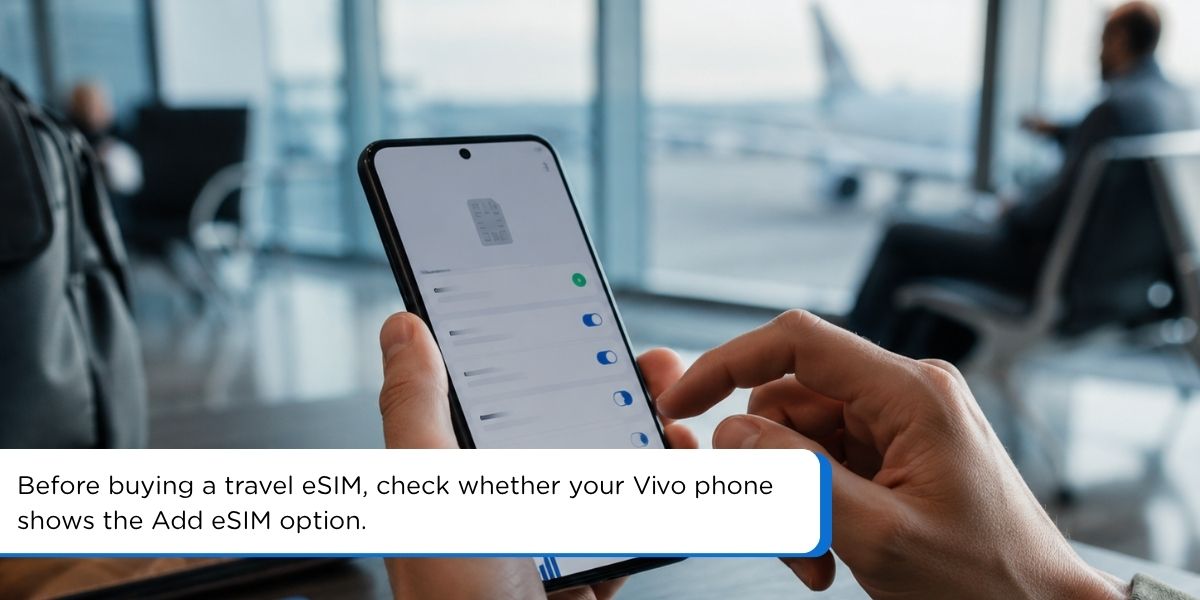
Important: Do not rely on the model name alone before buying a travel eSIM. Always check the “Add eSIM” option in your phone settings first.
Check if your phone supports eSIM with Gohub eSIM’s Device Checker or full list of eSIM-compatible phones
eSIM Availability Can Vary by Region
Even if your Vivo model supports eSIM, the feature may not be available on every regional version of the phone.
This usually happens because eSIM support can depend on:
- The country or region where the phone was purchased
- The exact model number
- Carrier settings
- Local telecom regulations
- Firmware or software version
For example, a Vivo phone sold in Europe or Latin America may show the “Add eSIM” option, while a similar model sold in another market may not. This is why checking the model name alone is not enough.
Before buying a travel eSIM, check your phone directly:
Settings > SIM card & mobile network
Then look for “Add eSIM” or “eSIM.”
If the option appears, your phone likely supports eSIM. If it does not appear, your Vivo phone may not support eSIM, or the eSIM feature may be disabled for your region or carrier.
If you are still unsure, contact Vivo support or your mobile carrier with your exact model number before purchasing an eSIM plan.
How to Check eSIM Support on Vivo
Before buying or installing an eSIM, check whether your Vivo phone has the eSIM option in settings.
Follow these steps:
- Open Settings
- Tap SIM card & mobile network
- Look for Add eSIM or eSIM
- Tap the option if it appears
- Follow the on-screen instructions to add an eSIM profile
If you can see Add eSIM, your Vivo phone likely supports eSIM. If you cannot see this option, your device may not support eSIM, or eSIM may be disabled by your region, carrier, or software version.
You can also check your exact model number by going to:
Settings > About phone
Then contact Vivo support or your carrier to confirm whether that specific version supports eSIM.
Important: A Vivo model name alone is not enough to confirm eSIM support. Always check the actual phone settings before purchasing a travel eSIM.
What If Your Vivo Phone Does Not Support eSIM?
If your Vivo phone does not show the “Add eSIM” option, it likely does not support native eSIM activation, or the feature may be disabled for your region, carrier, or software version.
In this case, you have a few options:
- Use a physical SIM card This is the safest option if your Vivo phone does not support eSIM. You can buy a local SIM card after arrival or order a travel SIM before your trip.
- Use another eSIM-compatible device If you have another phone that supports eSIM, you can install your travel eSIM on that device instead.
- Check with Vivo support or your carrier Contact Vivo support with your exact model number to confirm whether eSIM is supported on your specific device version.
- Consider third-party eSIM solutions carefully Some third-party products may allow selected Android phones to use eSIM through a special physical SIM card. However, this is not the same as built-in Vivo eSIM support, and compatibility can vary by device.
For most travelers, the safest choice is simple: if your Vivo phone does not support native eSIM, use a physical SIM or another eSIM-compatible phone instead of purchasing an eSIM that may not install.
Before You Activate eSIM on Vivo
Before adding an eSIM to your Vivo phone, prepare a few things first. This helps prevent failed installation, early plan activation, or unexpected roaming charges while traveling.
Make Sure Your Vivo Phone Is Unlocked
Your Vivo phone should be carrier-unlocked before you install a travel eSIM. If your phone is locked to one mobile carrier, it may not accept eSIM plans from another provider.
If you are not sure whether your phone is unlocked, contact your current carrier before purchasing an eSIM.
Connect to Stable Wi-Fi
You need a stable internet connection to download and install your eSIM profile. Wi-Fi is usually the safest option during setup.
Avoid installing your eSIM while using weak airport Wi-Fi, unstable mobile data, or a connection that may drop during activation.
Prepare Your QR Code or Manual Activation Code
Your eSIM provider will usually send you one of these:
- A QR code
- A manual activation code
- Setup instructions by email or app
Keep your QR code open on another device or print it before starting. If the QR code does not scan, use the manual activation code instead.
Manual activation codes often start with “LPA:”. Copy the full code exactly as provided, without adding spaces.
Read more: How to install eSIM on Android with Gohub Guide
Know When Your Travel eSIM Plan Starts
Before installing your travel eSIM, check when the plan validity starts. Some eSIM plans start when installed, while others start only after connecting to a supported network at your destination.
For travel, the safest setup is:
- Install the eSIM before departure if your provider allows it
- Keep the eSIM turned off until arrival
- Turn on data roaming only after you reach your destination
- Keep data roaming off on your physical SIM to avoid extra charges
If you are unsure, check your provider’s activation policy before scanning the QR code.
Traveling across Asia with your Vivo phone? Explore Gohub’s Asia travel eSIM plans to stay connected in multiple destinations without swapping physical SIM cards.
How to Activate eSIM on Vivo Using a QR Code
The easiest way to activate an eSIM on Vivo is by scanning the QR code from your eSIM provider. Before starting, make sure your phone supports eSIM, is connected to stable Wi-Fi, and has enough battery.
Follow these steps:
- Open Settings
- Tap SIM card & mobile network
- Select Add eSIM or eSIM
- Choose Scan QR code
- Scan the QR code provided by your eSIM provider
- Wait for your Vivo phone to download the eSIM profile
- Follow the on-screen instructions to finish adding the eSIM
- Name the eSIM clearly, such as “Travel eSIM” or your destination country
- Choose whether to turn it on now or later
If you are using a travel eSIM, do not enable data roaming too early unless your plan is meant to start immediately. Some travel eSIM plans may start after installation, while others start after connecting to a supported network at your destination.
For most travelers, the safest option is to install the eSIM before your trip, keep it turned off, and enable it only after arrival.
If the QR code does not scan, try increasing screen brightness, opening the QR code on another device, or using the manual activation code instead.
How to Activate eSIM on Vivo Manually
If your QR code does not scan, you can activate your eSIM manually using the activation code from your eSIM provider. This code usually starts with “LPA:”.
Before starting, copy the full activation code exactly as provided. Do not remove any characters or add extra spaces.
Follow these steps:
- Open Settings
- Tap SIM card & mobile network
- Select Add eSIM or eSIM
- Choose Enter activation code manually
- Paste or type the full activation code
- Check that the code is entered correctly
- Tap Add or Continue
- Wait for your Vivo phone to download the eSIM profile
- Follow the on-screen instructions to finish setup
- Name the eSIM clearly, such as “Travel eSIM” or your destination country
If you are setting up a travel eSIM before departure, keep the eSIM turned off until you arrive. After landing, turn it on, set it as your preferred mobile data SIM, and enable data roaming for the eSIM.
If manual activation fails, check your Wi-Fi connection, restart your phone, and try again. If the code still does not work, contact your eSIM provider before deleting the eSIM profile.
What to Do After You Arrive Abroad
After landing at your destination, turn on your Vivo eSIM and set it as your mobile data line. This helps your phone connect to the local partner network and use the travel eSIM for internet instead of your home SIM.
Follow these steps:
- Open Settings
- Tap SIM card & mobile network
- Select your travel eSIM
- Turn the eSIM on
- Set it as your Preferred data SIM
- Enable Data roaming for the eSIM
- Turn off data roaming on your physical SIM to avoid roaming charges
- Restart your phone if the eSIM does not connect after a few minutes
Your eSIM should connect to a local network shortly after activation. If it does not, wait a few minutes, check that mobile data is enabled, and make sure the eSIM is selected as the data line.
If the connection still does not work, try manual network selection:
Settings > SIM card & mobile network > Select your eSIM > Network operators
Turn off automatic network selection, wait for the available networks to load, then choose a supported local network. Some travel eSIMs only work with specific partner networks, so you may need to test more than one option.
How to Manage eSIM on Vivo
After installing your eSIM, you can manage it from your Vivo phone’s SIM settings. Menu names may vary depending on your Vivo model, Funtouch OS version, carrier, and region, but most eSIM controls are usually found under:
Settings > SIM card & mobile network
From there, you can turn your eSIM on or off, choose which SIM uses mobile data, enable data roaming, rename your eSIM profile, or remove the eSIM if you no longer need it.
Choose Your Preferred Data SIM
If you use both a physical SIM and an eSIM, your Vivo phone needs to know which SIM should use mobile data.
For travel, set your travel eSIM as the preferred data SIM:
- Open Settings
- Tap SIM card & mobile network
- Find Preferred data SIM
- Select your travel eSIM
- Make sure mobile data is turned on
This setup lets your Vivo phone use the travel eSIM for internet while keeping your physical SIM available for calls or SMS if needed.
Use eSIM and Physical SIM Together
On supported Vivo models, you may be able to use one physical SIM and one eSIM at the same time. This is useful if you want to keep your home number active while using your travel eSIM for maps, messaging, ride-hailing apps, and browsing.
A common travel setup is:
- Physical SIM: calls and SMS only
- Travel eSIM: mobile data
- Data roaming: on for the eSIM, off for the physical SIM
Before using this setup, check that your preferred data SIM is set correctly. If your physical SIM is still selected for mobile data, your home carrier may charge roaming fees.
Remove or Turn Off an eSIM Profile
If you are not using your eSIM yet, you can usually turn it off instead of deleting it. This is safer for travel eSIMs because some eSIM profiles cannot be installed again after removal.
Only remove an eSIM profile if:
- The plan has expired
- You no longer need the eSIM
- Your provider tells you to delete it
- You are sure the eSIM can be reinstalled if needed
Before deleting an eSIM, save your QR code, manual activation code, and order email. If you accidentally delete the profile, contact your eSIM provider before trying to install it again.
Troubleshooting Vivo eSIM Problems
If your eSIM does not activate or connect right away, do not delete the eSIM profile immediately. Many Vivo eSIM issues can be fixed by checking your Wi-Fi connection, restarting your phone, enabling data roaming for the correct SIM, or selecting a local network manually.
eSIM Stuck on Activating
If your Vivo eSIM is stuck on “Activating,” wait a few minutes first. eSIM activation can take longer depending on your internet connection, carrier, and destination network.
Try these steps:
- Keep your phone connected to stable Wi-Fi
- Restart your Vivo phone
- Check that the eSIM profile has been added correctly
- Wait a few more minutes for the network to register
- Make sure you are not trying to use the plan before its valid start time
Avoid deleting the eSIM unless your provider tells you to do so. Some eSIM profiles cannot be installed again after removal.
QR Code Not Scanning
If your Vivo phone cannot scan the QR code, try the following:
- Increase your screen brightness if scanning from another device
- Clean your phone camera lens
- Make sure the QR code is not cropped or blurry
- Try opening the QR code on another device
- Use the manual activation code if available
If your provider gave you a manual code, copy the full code exactly as shown. Many eSIM activation codes start with “LPA:”.
No Connection After Arrival
If your eSIM installs successfully but does not connect after you arrive, check your mobile data settings first.
Try this:
- Open Settings
- Tap SIM card & mobile network
- Select your travel eSIM
- Turn the eSIM on
- Set it as your Preferred data SIM
- Enable Data roaming for the eSIM
- Restart your phone
Also make sure data roaming is turned off on your physical SIM if you do not want to use your home carrier abroad.
Data Roaming Is On but Internet Still Does Not Work
If data roaming is already enabled but your eSIM still has no internet, try manual network selection.
Go to:
Settings > SIM card & mobile network > Select your eSIM > Network operators
Turn off automatic network selection and wait for available networks to appear. Then try the supported local networks one by one until your eSIM connects.
Some travel eSIMs work with specific partner networks only, so not every visible network will connect.
Mobile Data Is Using the Wrong SIM
If your physical SIM is still selected for mobile data, your phone may use your home carrier instead of your travel eSIM. This can lead to roaming charges.
To fix this:
- Open Settings
- Tap SIM card & mobile network
- Choose Preferred data SIM
- Select your travel eSIM
- Turn off data roaming for your physical SIM
For travel, your eSIM should be the data line, while your physical SIM can stay active for calls or SMS if needed.
When to Contact Support
Contact your eSIM provider if:
- The QR code has already been used but the eSIM was not installed
- Your eSIM is installed but cannot connect to any supported network
- Manual activation does not work
- Your plan shows no data after successful installation
- You accidentally deleted the eSIM profile
If you bought your eSIM from Gohub, contact support with your order email, destination country, Vivo model, screenshots of your SIM settings, and any error message shown on your phone.
FAQ: Vivo eSIM Compatibility and Activation
1. Do Vivo phones support eSIM?
Yes, some Vivo phones support eSIM, but not all models do. eSIM support depends on your exact Vivo model, region, carrier, and software version.
2. Which Vivo phones support eSIM?
Selected Vivo models support eSIM, including some devices in the X series, V series, Y series, and newer lineups. However, availability can vary by market.
The safest way to check is:
Settings > SIM card & mobile network > Add eSIM
If you see “Add eSIM” or “eSIM,” your Vivo phone likely supports eSIM.
3. How can I check if my Vivo phone supports eSIM?
Open Settings, go to SIM card & mobile network, and look for Add eSIM or eSIM.
If the option appears, your device likely supports eSIM. If it does not appear, your Vivo phone may not support eSIM, or the feature may be disabled by region, carrier, or software version.
4. Can I install a travel eSIM like Gohub on Vivo?
Yes, but only if your Vivo phone supports eSIM. Before purchasing a travel eSIM, check whether your phone has the “Add eSIM” option in settings.
5. Can I use eSIM and a physical SIM together on Vivo?
On supported Vivo models, yes. You may be able to use one physical SIM and one eSIM at the same time.
For travel, you can keep your physical SIM for calls or SMS and use your travel eSIM for mobile data.
6. How do I activate an eSIM on Vivo?
Go to:
Settings > SIM card & mobile network > Add eSIM
Then scan your eSIM QR code or enter the manual activation code from your provider. Make sure your phone is connected to stable Wi-Fi during setup.
7. What if my Vivo phone does not show the Add eSIM option?
If you cannot see the “Add eSIM” option, your Vivo phone may not support eSIM, or the feature may be unavailable because of your region, carrier, or software version.
Check your exact model number under:
Settings > About phone
Then contact Vivo support or your carrier to confirm compatibility.
8. What should I do if my Vivo phone does not support eSIM?
If your Vivo phone does not support eSIM, use a physical SIM card or another eSIM-compatible device instead.
Some third-party solutions may offer eSIM-like functionality through a special physical SIM card, but this is not the same as built-in Vivo eSIM support.
9. Is eSIM activation on Vivo instant?
eSIM activation is usually quick, but it is not always instant. In many cases, the eSIM profile installs within a few minutes, but network connection may take longer depending on your carrier, destination, signal coverage, and settings.
10. Should I activate my travel eSIM before or after arrival?
For travel eSIMs, check your provider’s activation policy first. Some plans start after installation, while others start after connecting to a supported network at your destination.
A safe option is to install the eSIM before your trip if allowed, keep it turned off, and enable it after you arrive.
11. Why is my Vivo eSIM installed but not working?
Your eSIM may not work if mobile data is using the wrong SIM, data roaming is off, the local network is not selected correctly, or your plan has not started yet.
Check these first:
- Set your travel eSIM as the preferred data SIM
- Enable data roaming for the eSIM
- Turn off data roaming on your physical SIM
- Restart your Vivo phone
- Try manual network selection
12. Can I delete and reinstall my Vivo eSIM?
Do not delete your eSIM unless your provider tells you to. Some eSIM profiles can only be installed once and may not work again after removal.
Before deleting an eSIM, save your QR code, manual activation code, and order email, then contact your provider for guidance.
Final Tips Before Using eSIM on Vivo
Using eSIM on a Vivo phone can make travel easier, but only if your device supports eSIM and the setup is done correctly.
Before buying or activating a travel eSIM, remember to:
- Check whether your Vivo phone shows the “Add eSIM” option
- Make sure your phone is carrier-unlocked
- Keep your QR code or manual activation code ready
- Connect to stable Wi-Fi during installation
- Set your travel eSIM as the preferred data SIM after arrival
- Enable data roaming only for your travel eSIM
- Keep data roaming off on your physical SIM to avoid extra charges
Once everything is set up, your Vivo eSIM can help you stay connected for maps, ride-hailing apps, messaging, translation, and travel planning without waiting in line for a local SIM card.
Need a Travel eSIM for Your Vivo?
Planning to use your Vivo phone abroad? First, check that your phone supports eSIM by looking for the “Add eSIM” option in settings.
If your device is compatible, you can choose a Gohub travel eSIM before your trip and install it with a QR code in just a few steps.
Gohub offers travel eSIM plans for popular destinations, with instant QR delivery and human support if you need help during setup.
Browse Gohub travel eSIM plans before your next trip
Curious about Apple’s latest? Explore eSIM setup for iPhone 16 here. Find your flight and hotel with:
Related Articles
- List of eSIM-Compatible Phones 2026
- How to Install eSIM on Android
- Gohub eSIM Installation Guide
- How to Choose the Best eSIM for International Travel
- eSIM vs International Roaming Cost
- Which Vivo phones may support eSIM
- How to check the “Add eSIM” option on your device
- How to activate eSIM on Vivo step by step
- How to manage eSIM and physical SIM settings
- How to fix common Vivo eSIM issues
Quick Answer: Can You Use eSIM on Vivo?
Yes, you can use eSIM on selected Vivo phones, but not every Vivo model supports it.
To check, go to:
Settings > SIM card & mobile network > Add eSIM
If you see the “Add eSIM” option, your Vivo phone likely supports eSIM. If the option does not appear, your model, region, carrier, or software version may not support eSIM.
Once your phone is compatible, you can activate an eSIM by scanning a QR code or entering the activation code manually. For travel eSIMs, install the eSIM before your trip if needed, but turn on data roaming only after you arrive at your destination.
Which Vivo Phones Support eSIM?
Not all Vivo phones support eSIM. eSIM availability depends on your exact model, the country or region where the phone was purchased, your carrier, and your software version.
According to vivo’s official eSIM support information, selected vivo models support eSIM, including some devices in the X series, V series, Y series, and newer lineups. Examples may include vivo X90 Pro, X100 Pro, X200 series, X300 series, V29/V29 Lite 5G, V40 series, V50 series, V60 series, V70 series, and selected Y series models, depending on market availability. Because eSIM support can vary by model and region, it’s best to confirm your device on vivo’s official eSIM support page and in your phone settings.
That means a Vivo phone with the same model name may support eSIM in one country but not in another. For example, some models sold in Europe, Latin America, or selected Asian markets may show the eSIM option, while another regional version of the same phone may not.
The safest way to check is directly on your phone:
Settings > SIM card & mobile network > Add eSIM
If you see “Add eSIM” or “eSIM,” your vivo phone likely supports eSIM. If this option does not appear, your phone may not support eSIM, or the feature may be disabled by region, carrier, or software version.
Important: Do not rely on the model name alone before buying a travel eSIM. Always check the “Add eSIM” option in your phone settings first.
Check if your phone supports eSIM with Gohub eSIM’s Device Checker or full list of eSIM-compatible phones
eSIM Availability Can Vary by Region
Even if your Vivo model supports eSIM, the feature may not be available on every regional version of the phone.
This usually happens because eSIM support can depend on:
- The country or region where the phone was purchased
- The exact model number
- Carrier settings
- Local telecom regulations
- Firmware or software version
For example, a Vivo phone sold in Europe or Latin America may show the “Add eSIM” option, while a similar model sold in another market may not. This is why checking the model name alone is not enough.
Before buying a travel eSIM, check your phone directly:
Settings > SIM card & mobile network
Then look for “Add eSIM” or “eSIM.”
If the option appears, your phone likely supports eSIM. If it does not appear, your Vivo phone may not support eSIM, or the eSIM feature may be disabled for your region or carrier.
If you are still unsure, contact Vivo support or your mobile carrier with your exact model number before purchasing an eSIM plan.
How to Check eSIM Support on Vivo
Before buying or installing an eSIM, check whether your Vivo phone has the eSIM option in settings.
Follow these steps:
- Open Settings
- Tap SIM card & mobile network
- Look for Add eSIM or eSIM
- Tap the option if it appears
- Follow the on-screen instructions to add an eSIM profile
If you can see Add eSIM, your Vivo phone likely supports eSIM. If you cannot see this option, your device may not support eSIM, or eSIM may be disabled by your region, carrier, or software version.
You can also check your exact model number by going to:
Settings > About phone
Then contact Vivo support or your carrier to confirm whether that specific version supports eSIM.
Important: A Vivo model name alone is not enough to confirm eSIM support. Always check the actual phone settings before purchasing a travel eSIM.
What If Your Vivo Phone Does Not Support eSIM?
If your Vivo phone does not show the “Add eSIM” option, it likely does not support native eSIM activation, or the feature may be disabled for your region, carrier, or software version.
In this case, you have a few options:
- Use a physical SIM card This is the safest option if your Vivo phone does not support eSIM. You can buy a local SIM card after arrival or order a travel SIM before your trip.
- Use another eSIM-compatible device If you have another phone that supports eSIM, you can install your travel eSIM on that device instead.
- Check with Vivo support or your carrier Contact Vivo support with your exact model number to confirm whether eSIM is supported on your specific device version.
- Consider third-party eSIM solutions carefully Some third-party products may allow selected Android phones to use eSIM through a special physical SIM card. However, this is not the same as built-in Vivo eSIM support, and compatibility can vary by device.
For most travelers, the safest choice is simple: if your Vivo phone does not support native eSIM, use a physical SIM or another eSIM-compatible phone instead of purchasing an eSIM that may not install.
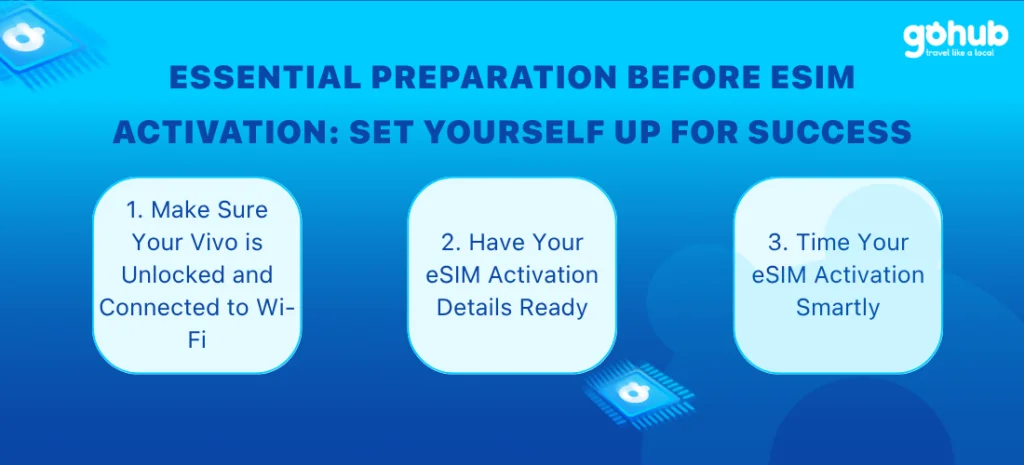
Before You Activate eSIM on Vivo
Before adding an eSIM to your Vivo phone, prepare a few things first. This helps prevent failed installation, early plan activation, or unexpected roaming charges while traveling.
Make Sure Your Vivo Phone Is Unlocked
Your Vivo phone should be carrier-unlocked before you install a travel eSIM. If your phone is locked to one mobile carrier, it may not accept eSIM plans from another provider.
If you are not sure whether your phone is unlocked, contact your current carrier before purchasing an eSIM.
Connect to Stable Wi-Fi
You need a stable internet connection to download and install your eSIM profile. Wi-Fi is usually the safest option during setup.
Avoid installing your eSIM while using weak airport Wi-Fi, unstable mobile data, or a connection that may drop during activation.
Prepare Your QR Code or Manual Activation Code
Your eSIM provider will usually send you one of these:
- A QR code
- A manual activation code
- Setup instructions by email or app
Keep your QR code open on another device or print it before starting. If the QR code does not scan, use the manual activation code instead.
Manual activation codes often start with “LPA:”. Copy the full code exactly as provided, without adding spaces.
Read more: How to install eSIM on Android with Gohub Guide
Know When Your Travel eSIM Plan Starts
Before installing your travel eSIM, check when the plan validity starts. Some eSIM plans start when installed, while others start only after connecting to a supported network at your destination.
For travel, the safest setup is:
- Install the eSIM before departure if your provider allows it
- Keep the eSIM turned off until arrival
- Turn on data roaming only after you reach your destination
- Keep data roaming off on your physical SIM to avoid extra charges
If you are unsure, check your provider’s activation policy before scanning the QR code.
Traveling across Asia with your Vivo phone? Explore Gohub’s Asia travel eSIM plans to stay connected in multiple destinations without swapping physical SIM cards.
How to Activate eSIM on Vivo Using a QR Code
The easiest way to activate an eSIM on Vivo is by scanning the QR code from your eSIM provider. Before starting, make sure your phone supports eSIM, is connected to stable Wi-Fi, and has enough battery.
Follow these steps:
- Open Settings
- Tap SIM card & mobile network
- Select Add eSIM or eSIM
- Choose Scan QR code
- Scan the QR code provided by your eSIM provider
- Wait for your Vivo phone to download the eSIM profile
- Follow the on-screen instructions to finish adding the eSIM
- Name the eSIM clearly, such as “Travel eSIM” or your destination country
- Choose whether to turn it on now or later
If you are using a travel eSIM, do not enable data roaming too early unless your plan is meant to start immediately. Some travel eSIM plans may start after installation, while others start after connecting to a supported network at your destination.
For most travelers, the safest option is to install the eSIM before your trip, keep it turned off, and enable it only after arrival.
If the QR code does not scan, try increasing screen brightness, opening the QR code on another device, or using the manual activation code instead.
How to Activate eSIM on Vivo Manually
If your QR code does not scan, you can activate your eSIM manually using the activation code from your eSIM provider. This code usually starts with “LPA:”.
Before starting, copy the full activation code exactly as provided. Do not remove any characters or add extra spaces.
Follow these steps:
- Open Settings
- Tap SIM card & mobile network
- Select Add eSIM or eSIM
- Choose Enter activation code manually
- Paste or type the full activation code
- Check that the code is entered correctly
- Tap Add or Continue
- Wait for your Vivo phone to download the eSIM profile
- Follow the on-screen instructions to finish setup
- Name the eSIM clearly, such as “Travel eSIM” or your destination country
If you are setting up a travel eSIM before departure, keep the eSIM turned off until you arrive. After landing, turn it on, set it as your preferred mobile data SIM, and enable data roaming for the eSIM.
If manual activation fails, check your Wi-Fi connection, restart your phone, and try again. If the code still does not work, contact your eSIM provider before deleting the eSIM profile.
What to Do After You Arrive Abroad
After landing at your destination, turn on your Vivo eSIM and set it as your mobile data line. This helps your phone connect to the local partner network and use the travel eSIM for internet instead of your home SIM.
Follow these steps:
- Open Settings
- Tap SIM card & mobile network
- Select your travel eSIM
- Turn the eSIM on
- Set it as your Preferred data SIM
- Enable Data roaming for the eSIM
- Turn off data roaming on your physical SIM to avoid roaming charges
- Restart your phone if the eSIM does not connect after a few minutes
Your eSIM should connect to a local network shortly after activation. If it does not, wait a few minutes, check that mobile data is enabled, and make sure the eSIM is selected as the data line.
If the connection still does not work, try manual network selection:
Settings > SIM card & mobile network > Select your eSIM > Network operators
Turn off automatic network selection, wait for the available networks to load, then choose a supported local network. Some travel eSIMs only work with specific partner networks, so you may need to test more than one option.
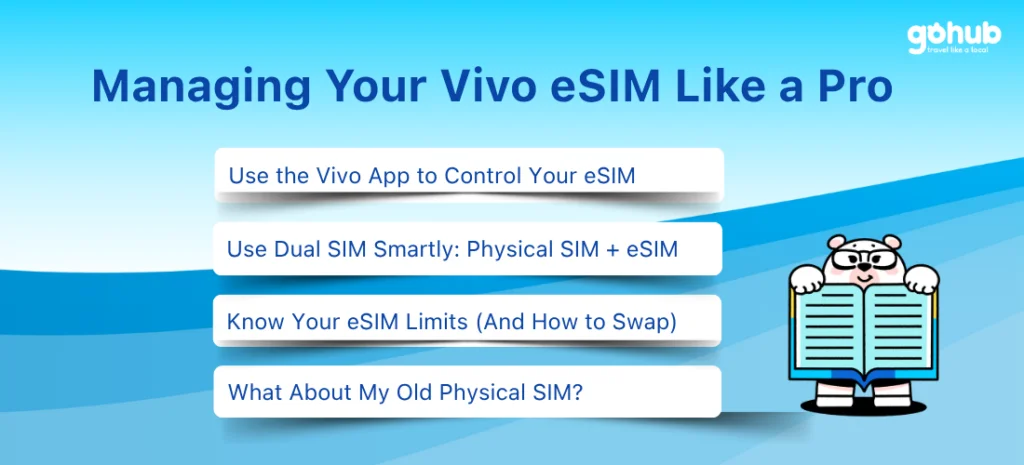
How to Manage eSIM on Vivo
After installing your eSIM, you can manage it from your Vivo phone’s SIM settings. Menu names may vary depending on your Vivo model, Funtouch OS version, carrier, and region, but most eSIM controls are usually found under:
Settings > SIM card & mobile network
From there, you can turn your eSIM on or off, choose which SIM uses mobile data, enable data roaming, rename your eSIM profile, or remove the eSIM if you no longer need it.
Choose Your Preferred Data SIM
If you use both a physical SIM and an eSIM, your Vivo phone needs to know which SIM should use mobile data.
For travel, set your travel eSIM as the preferred data SIM:
- Open Settings
- Tap SIM card & mobile network
- Find Preferred data SIM
- Select your travel eSIM
- Make sure mobile data is turned on
This setup lets your Vivo phone use the travel eSIM for internet while keeping your physical SIM available for calls or SMS if needed.
Use eSIM and Physical SIM Together
On supported Vivo models, you may be able to use one physical SIM and one eSIM at the same time. This is useful if you want to keep your home number active while using your travel eSIM for maps, messaging, ride-hailing apps, and browsing.
A common travel setup is:
- Physical SIM: calls and SMS only
- Travel eSIM: mobile data
- Data roaming: on for the eSIM, off for the physical SIM
Before using this setup, check that your preferred data SIM is set correctly. If your physical SIM is still selected for mobile data, your home carrier may charge roaming fees.
Remove or Turn Off an eSIM Profile
If you are not using your eSIM yet, you can usually turn it off instead of deleting it. This is safer for travel eSIMs because some eSIM profiles cannot be installed again after removal.
Only remove an eSIM profile if:
- The plan has expired
- You no longer need the eSIM
- Your provider tells you to delete it
- You are sure the eSIM can be reinstalled if needed
Before deleting an eSIM, save your QR code, manual activation code, and order email. If you accidentally delete the profile, contact your eSIM provider before trying to install it again.
Troubleshooting Vivo eSIM Problems
If your eSIM does not activate or connect right away, do not delete the eSIM profile immediately. Many Vivo eSIM issues can be fixed by checking your Wi-Fi connection, restarting your phone, enabling data roaming for the correct SIM, or selecting a local network manually.
eSIM Stuck on Activating
If your Vivo eSIM is stuck on “Activating,” wait a few minutes first. eSIM activation can take longer depending on your internet connection, carrier, and destination network.
Try these steps:
- Keep your phone connected to stable Wi-Fi
- Restart your Vivo phone
- Check that the eSIM profile has been added correctly
- Wait a few more minutes for the network to register
- Make sure you are not trying to use the plan before its valid start time
Avoid deleting the eSIM unless your provider tells you to do so. Some eSIM profiles cannot be installed again after removal.
QR Code Not Scanning
If your Vivo phone cannot scan the QR code, try the following:
- Increase your screen brightness if scanning from another device
- Clean your phone camera lens
- Make sure the QR code is not cropped or blurry
- Try opening the QR code on another device
- Use the manual activation code if available
If your provider gave you a manual code, copy the full code exactly as shown. Many eSIM activation codes start with “LPA:”.
No Connection After Arrival
If your eSIM installs successfully but does not connect after you arrive, check your mobile data settings first.
Try this:
- Open Settings
- Tap SIM card & mobile network
- Select your travel eSIM
- Turn the eSIM on
- Set it as your Preferred data SIM
- Enable Data roaming for the eSIM
- Restart your phone
Also make sure data roaming is turned off on your physical SIM if you do not want to use your home carrier abroad.
Data Roaming Is On but Internet Still Does Not Work
If data roaming is already enabled but your eSIM still has no internet, try manual network selection.
Go to:
Settings > SIM card & mobile network > Select your eSIM > Network operators
Turn off automatic network selection and wait for available networks to appear. Then try the supported local networks one by one until your eSIM connects.
Some travel eSIMs work with specific partner networks only, so not every visible network will connect.
Mobile Data Is Using the Wrong SIM
If your physical SIM is still selected for mobile data, your phone may use your home carrier instead of your travel eSIM. This can lead to roaming charges.
To fix this:
- Open Settings
- Tap SIM card & mobile network
- Choose Preferred data SIM
- Select your travel eSIM
- Turn off data roaming for your physical SIM
For travel, your eSIM should be the data line, while your physical SIM can stay active for calls or SMS if needed.
When to Contact Support
Contact your eSIM provider if:
- The QR code has already been used but the eSIM was not installed
- Your eSIM is installed but cannot connect to any supported network
- Manual activation does not work
- Your plan shows no data after successful installation
- You accidentally deleted the eSIM profile
If you bought your eSIM from Gohub, contact support with your order email, destination country, Vivo model, screenshots of your SIM settings, and any error message shown on your phone.
FAQ: Vivo eSIM Compatibility and Activation
1. Do Vivo phones support eSIM?
Yes, some Vivo phones support eSIM, but not all models do. eSIM support depends on your exact Vivo model, region, carrier, and software version.
2. Which Vivo phones support eSIM?
Selected Vivo models support eSIM, including some devices in the X series, V series, Y series, and newer lineups. However, availability can vary by market.
The safest way to check is:
Settings > SIM card & mobile network > Add eSIM
If you see “Add eSIM” or “eSIM,” your Vivo phone likely supports eSIM.
3. How can I check if my Vivo phone supports eSIM?
Open Settings, go to SIM card & mobile network, and look for Add eSIM or eSIM.
If the option appears, your device likely supports eSIM. If it does not appear, your Vivo phone may not support eSIM, or the feature may be disabled by region, carrier, or software version.
4. Can I install a travel eSIM like Gohub on Vivo?
Yes, but only if your Vivo phone supports eSIM. Before purchasing a travel eSIM, check whether your phone has the “Add eSIM” option in settings.
5. Can I use eSIM and a physical SIM together on Vivo?
On supported Vivo models, yes. You may be able to use one physical SIM and one eSIM at the same time.
For travel, you can keep your physical SIM for calls or SMS and use your travel eSIM for mobile data.
6. How do I activate an eSIM on Vivo?
Go to:
Settings > SIM card & mobile network > Add eSIM
Then scan your eSIM QR code or enter the manual activation code from your provider. Make sure your phone is connected to stable Wi-Fi during setup.
7. What if my Vivo phone does not show the Add eSIM option?
If you cannot see the “Add eSIM” option, your Vivo phone may not support eSIM, or the feature may be unavailable because of your region, carrier, or software version.
Check your exact model number under:
Settings > About phone
Then contact Vivo support or your carrier to confirm compatibility.
8. What should I do if my Vivo phone does not support eSIM?
If your Vivo phone does not support eSIM, use a physical SIM card or another eSIM-compatible device instead.
Some third-party solutions may offer eSIM-like functionality through a special physical SIM card, but this is not the same as built-in Vivo eSIM support.
9. Is eSIM activation on Vivo instant?
eSIM activation is usually quick, but it is not always instant. In many cases, the eSIM profile installs within a few minutes, but network connection may take longer depending on your carrier, destination, signal coverage, and settings.
10. Should I activate my travel eSIM before or after arrival?
For travel eSIMs, check your provider’s activation policy first. Some plans start after installation, while others start after connecting to a supported network at your destination.
A safe option is to install the eSIM before your trip if allowed, keep it turned off, and enable it after you arrive.
11. Why is my Vivo eSIM installed but not working?
Your eSIM may not work if mobile data is using the wrong SIM, data roaming is off, the local network is not selected correctly, or your plan has not started yet.
Check these first:
- Set your travel eSIM as the preferred data SIM
- Enable data roaming for the eSIM
- Turn off data roaming on your physical SIM
- Restart your Vivo phone
- Try manual network selection
12. Can I delete and reinstall my Vivo eSIM?
Do not delete your eSIM unless your provider tells you to. Some eSIM profiles can only be installed once and may not work again after removal.
Before deleting an eSIM, save your QR code, manual activation code, and order email, then contact your provider for guidance.
Final Tips Before Using eSIM on Vivo
Using eSIM on a Vivo phone can make travel easier, but only if your device supports eSIM and the setup is done correctly.
Before buying or activating a travel eSIM, remember to:
- Check whether your Vivo phone shows the “Add eSIM” option
- Make sure your phone is carrier-unlocked
- Keep your QR code or manual activation code ready
- Connect to stable Wi-Fi during installation
- Set your travel eSIM as the preferred data SIM after arrival
- Enable data roaming only for your travel eSIM
- Keep data roaming off on your physical SIM to avoid extra charges
Once everything is set up, your Vivo eSIM can help you stay connected for maps, ride-hailing apps, messaging, translation, and travel planning without waiting in line for a local SIM card.
Need a Travel eSIM for Your Vivo?
Planning to use your Vivo phone abroad? First, check that your phone supports eSIM by looking for the “Add eSIM” option in settings.
If your device is compatible, you can choose a Gohub travel eSIM before your trip and install it with a QR code in just a few steps.
Gohub offers travel eSIM plans for popular destinations, with instant QR delivery and human support if you need help during setup.
Browse Gohub travel eSIM plans before your next trip
Curious about Apple’s latest? Explore eSIM setup for iPhone 16 here. Find your flight and hotel with:
Related Articles
- List of eSIM-Compatible Phones 2026
- How to Install eSIM on Android
- Gohub eSIM Installation Guide
- How to Choose the Best eSIM for International Travel
- eSIM vs International Roaming Cost
If you’re trying to activate an eSIM on a Vivo phone, the first thing to check is compatibility. Not every Vivo model supports eSIM, and availability can vary by region, carrier, and software version.
This guide explains how to check whether your Vivo phone supports eSIM, how to add an eSIM using a QR code or manual activation code, and what to do if your eSIM does not connect while traveling.
You’ll learn:
- Which Vivo phones may support eSIM
- How to check the “Add eSIM” option on your device
- How to activate eSIM on Vivo step by step
- How to manage eSIM and physical SIM settings
- How to fix common Vivo eSIM issues
Quick Answer: Can You Use eSIM on Vivo?
Yes, you can use eSIM on selected Vivo phones, but not every Vivo model supports it.
To check, go to:
Settings > SIM card & mobile network > Add eSIM
If you see the “Add eSIM” option, your Vivo phone likely supports eSIM. If the option does not appear, your model, region, carrier, or software version may not support eSIM.
Once your phone is compatible, you can activate an eSIM by scanning a QR code or entering the activation code manually. For travel eSIMs, install the eSIM before your trip if needed, but turn on data roaming only after you arrive at your destination.
Which Vivo Phones Support eSIM?
Not all Vivo phones support eSIM. eSIM availability depends on your exact model, the country or region where the phone was purchased, your carrier, and your software version.
According to vivo’s official eSIM support information, selected vivo models support eSIM, including some devices in the X series, V series, Y series, and newer lineups. Examples may include vivo X90 Pro, X100 Pro, X200 series, X300 series, V29/V29 Lite 5G, V40 series, V50 series, V60 series, V70 series, and selected Y series models, depending on market availability. Because eSIM support can vary by model and region, it’s best to confirm your device on vivo’s official eSIM support page and in your phone settings.
That means a Vivo phone with the same model name may support eSIM in one country but not in another. For example, some models sold in Europe, Latin America, or selected Asian markets may show the eSIM option, while another regional version of the same phone may not.
The safest way to check is directly on your phone:
Settings > SIM card & mobile network > Add eSIM
If you see “Add eSIM” or “eSIM,” your vivo phone likely supports eSIM. If this option does not appear, your phone may not support eSIM, or the feature may be disabled by region, carrier, or software version.
Important: Do not rely on the model name alone before buying a travel eSIM. Always check the “Add eSIM” option in your phone settings first.
Check if your phone supports eSIM with Gohub eSIM’s Device Checker or full list of eSIM-compatible phones
eSIM Availability Can Vary by Region
Even if your Vivo model supports eSIM, the feature may not be available on every regional version of the phone.
This usually happens because eSIM support can depend on:
- The country or region where the phone was purchased
- The exact model number
- Carrier settings
- Local telecom regulations
- Firmware or software version
For example, a Vivo phone sold in Europe or Latin America may show the “Add eSIM” option, while a similar model sold in another market may not. This is why checking the model name alone is not enough.
Before buying a travel eSIM, check your phone directly:
Settings > SIM card & mobile network
Then look for “Add eSIM” or “eSIM.”
If the option appears, your phone likely supports eSIM. If it does not appear, your Vivo phone may not support eSIM, or the eSIM feature may be disabled for your region or carrier.
If you are still unsure, contact Vivo support or your mobile carrier with your exact model number before purchasing an eSIM plan.
How to Check eSIM Support on Vivo
Before buying or installing an eSIM, check whether your Vivo phone has the eSIM option in settings.
Follow these steps:
- Open Settings
- Tap SIM card & mobile network
- Look for Add eSIM or eSIM
- Tap the option if it appears
- Follow the on-screen instructions to add an eSIM profile
If you can see Add eSIM, your Vivo phone likely supports eSIM. If you cannot see this option, your device may not support eSIM, or eSIM may be disabled by your region, carrier, or software version.
You can also check your exact model number by going to:
Settings > About phone
Then contact Vivo support or your carrier to confirm whether that specific version supports eSIM.
Important: A Vivo model name alone is not enough to confirm eSIM support. Always check the actual phone settings before purchasing a travel eSIM.
What If Your Vivo Phone Does Not Support eSIM?
If your Vivo phone does not show the “Add eSIM” option, it likely does not support native eSIM activation, or the feature may be disabled for your region, carrier, or software version.
In this case, you have a few options:
- Use a physical SIM card This is the safest option if your Vivo phone does not support eSIM. You can buy a local SIM card after arrival or order a travel SIM before your trip.
- Use another eSIM-compatible device If you have another phone that supports eSIM, you can install your travel eSIM on that device instead.
- Check with Vivo support or your carrier Contact Vivo support with your exact model number to confirm whether eSIM is supported on your specific device version.
- Consider third-party eSIM solutions carefully Some third-party products may allow selected Android phones to use eSIM through a special physical SIM card. However, this is not the same as built-in Vivo eSIM support, and compatibility can vary by device.
For most travelers, the safest choice is simple: if your Vivo phone does not support native eSIM, use a physical SIM or another eSIM-compatible phone instead of purchasing an eSIM that may not install.
Before You Activate eSIM on Vivo
Before adding an eSIM to your Vivo phone, prepare a few things first. This helps prevent failed installation, early plan activation, or unexpected roaming charges while traveling.
Make Sure Your Vivo Phone Is Unlocked
Your Vivo phone should be carrier-unlocked before you install a travel eSIM. If your phone is locked to one mobile carrier, it may not accept eSIM plans from another provider.
If you are not sure whether your phone is unlocked, contact your current carrier before purchasing an eSIM.
Connect to Stable Wi-Fi
You need a stable internet connection to download and install your eSIM profile. Wi-Fi is usually the safest option during setup.
Avoid installing your eSIM while using weak airport Wi-Fi, unstable mobile data, or a connection that may drop during activation.
Prepare Your QR Code or Manual Activation Code
Your eSIM provider will usually send you one of these:
- A QR code
- A manual activation code
- Setup instructions by email or app
Keep your QR code open on another device or print it before starting. If the QR code does not scan, use the manual activation code instead.
Manual activation codes often start with “LPA:”. Copy the full code exactly as provided, without adding spaces.
Read more: How to install eSIM on Android with Gohub Guide
Know When Your Travel eSIM Plan Starts
Before installing your travel eSIM, check when the plan validity starts. Some eSIM plans start when installed, while others start only after connecting to a supported network at your destination.
For travel, the safest setup is:
- Install the eSIM before departure if your provider allows it
- Keep the eSIM turned off until arrival
- Turn on data roaming only after you reach your destination
- Keep data roaming off on your physical SIM to avoid extra charges
If you are unsure, check your provider’s activation policy before scanning the QR code.
Traveling across Asia with your Vivo phone? Explore Gohub’s Asia travel eSIM plans to stay connected in multiple destinations without swapping physical SIM cards.
How to Activate eSIM on Vivo Using a QR Code
The easiest way to activate an eSIM on Vivo is by scanning the QR code from your eSIM provider. Before starting, make sure your phone supports eSIM, is connected to stable Wi-Fi, and has enough battery.
Follow these steps:
- Open Settings
- Tap SIM card & mobile network
- Select Add eSIM or eSIM
- Choose Scan QR code
- Scan the QR code provided by your eSIM provider
- Wait for your Vivo phone to download the eSIM profile
- Follow the on-screen instructions to finish adding the eSIM
- Name the eSIM clearly, such as “Travel eSIM” or your destination country
- Choose whether to turn it on now or later
If you are using a travel eSIM, do not enable data roaming too early unless your plan is meant to start immediately. Some travel eSIM plans may start after installation, while others start after connecting to a supported network at your destination.
For most travelers, the safest option is to install the eSIM before your trip, keep it turned off, and enable it only after arrival.
If the QR code does not scan, try increasing screen brightness, opening the QR code on another device, or using the manual activation code instead.
How to Activate eSIM on Vivo Manually
If your QR code does not scan, you can activate your eSIM manually using the activation code from your eSIM provider. This code usually starts with “LPA:”.
Before starting, copy the full activation code exactly as provided. Do not remove any characters or add extra spaces.
Follow these steps:
- Open Settings
- Tap SIM card & mobile network
- Select Add eSIM or eSIM
- Choose Enter activation code manually
- Paste or type the full activation code
- Check that the code is entered correctly
- Tap Add or Continue
- Wait for your Vivo phone to download the eSIM profile
- Follow the on-screen instructions to finish setup
- Name the eSIM clearly, such as “Travel eSIM” or your destination country
If you are setting up a travel eSIM before departure, keep the eSIM turned off until you arrive. After landing, turn it on, set it as your preferred mobile data SIM, and enable data roaming for the eSIM.
If manual activation fails, check your Wi-Fi connection, restart your phone, and try again. If the code still does not work, contact your eSIM provider before deleting the eSIM profile.
What to Do After You Arrive Abroad
After landing at your destination, turn on your Vivo eSIM and set it as your mobile data line. This helps your phone connect to the local partner network and use the travel eSIM for internet instead of your home SIM.
Follow these steps:
- Open Settings
- Tap SIM card & mobile network
- Select your travel eSIM
- Turn the eSIM on
- Set it as your Preferred data SIM
- Enable Data roaming for the eSIM
- Turn off data roaming on your physical SIM to avoid roaming charges
- Restart your phone if the eSIM does not connect after a few minutes
Your eSIM should connect to a local network shortly after activation. If it does not, wait a few minutes, check that mobile data is enabled, and make sure the eSIM is selected as the data line.
If the connection still does not work, try manual network selection:
Settings > SIM card & mobile network > Select your eSIM > Network operators
Turn off automatic network selection, wait for the available networks to load, then choose a supported local network. Some travel eSIMs only work with specific partner networks, so you may need to test more than one option.
How to Manage eSIM on Vivo
After installing your eSIM, you can manage it from your Vivo phone’s SIM settings. Menu names may vary depending on your Vivo model, Funtouch OS version, carrier, and region, but most eSIM controls are usually found under:
Settings > SIM card & mobile network
From there, you can turn your eSIM on or off, choose which SIM uses mobile data, enable data roaming, rename your eSIM profile, or remove the eSIM if you no longer need it.
Choose Your Preferred Data SIM
If you use both a physical SIM and an eSIM, your Vivo phone needs to know which SIM should use mobile data.
For travel, set your travel eSIM as the preferred data SIM:
- Open Settings
- Tap SIM card & mobile network
- Find Preferred data SIM
- Select your travel eSIM
- Make sure mobile data is turned on
This setup lets your Vivo phone use the travel eSIM for internet while keeping your physical SIM available for calls or SMS if needed.
Use eSIM and Physical SIM Together
On supported Vivo models, you may be able to use one physical SIM and one eSIM at the same time. This is useful if you want to keep your home number active while using your travel eSIM for maps, messaging, ride-hailing apps, and browsing.
A common travel setup is:
- Physical SIM: calls and SMS only
- Travel eSIM: mobile data
- Data roaming: on for the eSIM, off for the physical SIM
Before using this setup, check that your preferred data SIM is set correctly. If your physical SIM is still selected for mobile data, your home carrier may charge roaming fees.
Remove or Turn Off an eSIM Profile
If you are not using your eSIM yet, you can usually turn it off instead of deleting it. This is safer for travel eSIMs because some eSIM profiles cannot be installed again after removal.
Only remove an eSIM profile if:
- The plan has expired
- You no longer need the eSIM
- Your provider tells you to delete it
- You are sure the eSIM can be reinstalled if needed
Before deleting an eSIM, save your QR code, manual activation code, and order email. If you accidentally delete the profile, contact your eSIM provider before trying to install it again.
Troubleshooting Vivo eSIM Problems
If your eSIM does not activate or connect right away, do not delete the eSIM profile immediately. Many Vivo eSIM issues can be fixed by checking your Wi-Fi connection, restarting your phone, enabling data roaming for the correct SIM, or selecting a local network manually.
eSIM Stuck on Activating
If your Vivo eSIM is stuck on “Activating,” wait a few minutes first. eSIM activation can take longer depending on your internet connection, carrier, and destination network.
Try these steps:
- Keep your phone connected to stable Wi-Fi
- Restart your Vivo phone
- Check that the eSIM profile has been added correctly
- Wait a few more minutes for the network to register
- Make sure you are not trying to use the plan before its valid start time
Avoid deleting the eSIM unless your provider tells you to do so. Some eSIM profiles cannot be installed again after removal.
QR Code Not Scanning
If your Vivo phone cannot scan the QR code, try the following:
- Increase your screen brightness if scanning from another device
- Clean your phone camera lens
- Make sure the QR code is not cropped or blurry
- Try opening the QR code on another device
- Use the manual activation code if available
If your provider gave you a manual code, copy the full code exactly as shown. Many eSIM activation codes start with “LPA:”.
No Connection After Arrival
If your eSIM installs successfully but does not connect after you arrive, check your mobile data settings first.
Try this:
- Open Settings
- Tap SIM card & mobile network
- Select your travel eSIM
- Turn the eSIM on
- Set it as your Preferred data SIM
- Enable Data roaming for the eSIM
- Restart your phone
Also make sure data roaming is turned off on your physical SIM if you do not want to use your home carrier abroad.
Data Roaming Is On but Internet Still Does Not Work
If data roaming is already enabled but your eSIM still has no internet, try manual network selection.
Go to:
Settings > SIM card & mobile network > Select your eSIM > Network operators
Turn off automatic network selection and wait for available networks to appear. Then try the supported local networks one by one until your eSIM connects.
Some travel eSIMs work with specific partner networks only, so not every visible network will connect.
Mobile Data Is Using the Wrong SIM
If your physical SIM is still selected for mobile data, your phone may use your home carrier instead of your travel eSIM. This can lead to roaming charges.
To fix this:
- Open Settings
- Tap SIM card & mobile network
- Choose Preferred data SIM
- Select your travel eSIM
- Turn off data roaming for your physical SIM
For travel, your eSIM should be the data line, while your physical SIM can stay active for calls or SMS if needed.
When to Contact Support
Contact your eSIM provider if:
- The QR code has already been used but the eSIM was not installed
- Your eSIM is installed but cannot connect to any supported network
- Manual activation does not work
- Your plan shows no data after successful installation
- You accidentally deleted the eSIM profile
If you bought your eSIM from Gohub, contact support with your order email, destination country, Vivo model, screenshots of your SIM settings, and any error message shown on your phone.
FAQ: Vivo eSIM Compatibility and Activation
1. Do Vivo phones support eSIM?
Yes, some Vivo phones support eSIM, but not all models do. eSIM support depends on your exact Vivo model, region, carrier, and software version.
2. Which Vivo phones support eSIM?
Selected Vivo models support eSIM, including some devices in the X series, V series, Y series, and newer lineups. However, availability can vary by market.
The safest way to check is:
Settings > SIM card & mobile network > Add eSIM
If you see “Add eSIM” or “eSIM,” your Vivo phone likely supports eSIM.
3. How can I check if my Vivo phone supports eSIM?
Open Settings, go to SIM card & mobile network, and look for Add eSIM or eSIM.
If the option appears, your device likely supports eSIM. If it does not appear, your Vivo phone may not support eSIM, or the feature may be disabled by region, carrier, or software version.
4. Can I install a travel eSIM like Gohub on Vivo?
Yes, but only if your Vivo phone supports eSIM. Before purchasing a travel eSIM, check whether your phone has the “Add eSIM” option in settings.
5. Can I use eSIM and a physical SIM together on Vivo?
On supported Vivo models, yes. You may be able to use one physical SIM and one eSIM at the same time.
For travel, you can keep your physical SIM for calls or SMS and use your travel eSIM for mobile data.
6. How do I activate an eSIM on Vivo?
Go to:
Settings > SIM card & mobile network > Add eSIM
Then scan your eSIM QR code or enter the manual activation code from your provider. Make sure your phone is connected to stable Wi-Fi during setup.
7. What if my Vivo phone does not show the Add eSIM option?
If you cannot see the “Add eSIM” option, your Vivo phone may not support eSIM, or the feature may be unavailable because of your region, carrier, or software version.
Check your exact model number under:
Settings > About phone
Then contact Vivo support or your carrier to confirm compatibility.
8. What should I do if my Vivo phone does not support eSIM?
If your Vivo phone does not support eSIM, use a physical SIM card or another eSIM-compatible device instead.
Some third-party solutions may offer eSIM-like functionality through a special physical SIM card, but this is not the same as built-in Vivo eSIM support.
9. Is eSIM activation on Vivo instant?
eSIM activation is usually quick, but it is not always instant. In many cases, the eSIM profile installs within a few minutes, but network connection may take longer depending on your carrier, destination, signal coverage, and settings.
10. Should I activate my travel eSIM before or after arrival?
For travel eSIMs, check your provider’s activation policy first. Some plans start after installation, while others start after connecting to a supported network at your destination.
A safe option is to install the eSIM before your trip if allowed, keep it turned off, and enable it after you arrive.
11. Why is my Vivo eSIM installed but not working?
Your eSIM may not work if mobile data is using the wrong SIM, data roaming is off, the local network is not selected correctly, or your plan has not started yet.
Check these first:
- Set your travel eSIM as the preferred data SIM
- Enable data roaming for the eSIM
- Turn off data roaming on your physical SIM
- Restart your Vivo phone
- Try manual network selection
12. Can I delete and reinstall my Vivo eSIM?
Do not delete your eSIM unless your provider tells you to. Some eSIM profiles can only be installed once and may not work again after removal.
Before deleting an eSIM, save your QR code, manual activation code, and order email, then contact your provider for guidance.
Final Tips Before Using eSIM on Vivo
Using eSIM on a Vivo phone can make travel easier, but only if your device supports eSIM and the setup is done correctly.
Before buying or activating a travel eSIM, remember to:
- Check whether your Vivo phone shows the “Add eSIM” option
- Make sure your phone is carrier-unlocked
- Keep your QR code or manual activation code ready
- Connect to stable Wi-Fi during installation
- Set your travel eSIM as the preferred data SIM after arrival
- Enable data roaming only for your travel eSIM
- Keep data roaming off on your physical SIM to avoid extra charges
Once everything is set up, your Vivo eSIM can help you stay connected for maps, ride-hailing apps, messaging, translation, and travel planning without waiting in line for a local SIM card.
Need a Travel eSIM for Your Vivo?
Planning to use your Vivo phone abroad? First, check that your phone supports eSIM by looking for the “Add eSIM” option in settings.
If your device is compatible, you can choose a Gohub travel eSIM before your trip and install it with a QR code in just a few steps.
Gohub offers travel eSIM plans for popular destinations, with instant QR delivery and human support if you need help during setup.
Browse Gohub travel eSIM plans before your next trip
Curious about Apple’s latest? Explore eSIM setup for iPhone 16 here. Find your flight and hotel with: